I couldn't let the opportunity go to
Royal icing you ask.. dries hard, can be tinted, diluted to use for fill or leave as is for piping and is durable yet still tastes good. I have been using this recipe from Antonia74 from cakecentral.com for a long time now. She suggests using a stand mixer with paddle attachment (but I don't have a paddle attachement) to make it. A hand mixer will work, but you have to blend it on the lowest speed for 10 minutes {this will be the longest 10 minutes of your life...trust me.}.
Antonia 74 Royal Icing
Here's what you need:
- 1 kg (that's roughly 2 1/4 lbs folks) icing sugar (aka: confections sugar, powdered sugar)
- 3/4 c. luke warm water (not hot...it doesn't like hot)
- 5 tbsp meringue powder (go to Michaels or Bulk Barn and ask for it, it's just easier)
- 1 tsp cream of tartar
When I mix my icing up I prefer to mix it in small batches by colour because I don't always know if I am going to need the entire recipe for filling or piping. Do what you wish as you see fit for your own purposes.
Here's what I do:
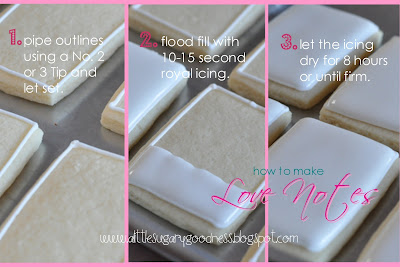
- Transfer out the portion of icing you want to use for your borders. If it's too thick and won't squeeze nicely out of a piping bag add a few drops of water at a time to get the proper consistency. Remember, this is for piping..you want your lines to maintain their shape, not fall flat. If it goes flat...you've added too much water. Don't worry, you can use this icing for filling in your lines after.
- Tint the icing if you want it coloured.
- Prepare your icing bag fitted with a No. 2 or 3 round tip. To make my life easier I stand up the bag in a tall glass and fold down the top so I don't get icing everywhere.
- Fill the bag and start piping.
To achieve 10 to 15 second royal icing, add water by the drop and mix it in... count how many seconds it takes to get your icing to flatten. The longer it takes the firmer (or puffier) the appearance will be.
After these have set and are hard to touch, you are ready to add your next layer of decor. For me, it was some premade royal icing hearts and black icing for the text.
A trick I learned from Sweetopia.net for easy removal of premade embellishments is to smear a thin layer of shortening over your plastic transfer (like what they use for overheads). Pipe on, dry, pop off! That easy. Depending on how large your transfers get (like my Scooby doo from Emma's birthday cake) "popping" them off may be somewhat intimidating, and nerve racking (so always make extra incase of breakage!) {I used a flat spatula to carefully lift scooby off the plastic sheet..the shortening was my saving grace}.
Using a dab of "border-line" thick icing I attached the hearts, then I went on to piping the letters. The black was watered down a little to the same consistency as the borders were so it would flow, but not lay flat. Then they dried. Bag'em up and take'em out, share with your friends and bask in thier amazement and envy :)
Now it's your turn to share the love!
Happy Baking,


No comments:
Post a Comment