Tuesday, September 18, 2012

Farmer's Market Gingersnaps


So, I've been in hiding a little...okay, a LOT! I am sorry for that. The summer as flown by we were busy with lake stuff, a family reunion, a knee surgery...YES! That is the main reason why I haven't been able to bring any new posts.
 
Alas, I am back, slow(er) and steady...starting with a lunchbox staple for my kids. It's fast, and easy and requires little messing around and minimal ingredients in the grand scheme of things.  Plus, they smell nice, look pretty and taste amazing!
 
Back to the basics, who wouldn't want to sink their teeth into a soft chewy gingersnap, aromas of cinnamon, ginger and cloves will fill your kitchen and make you aware you should have made a double batch. Believe me, the 3 dozen little morsels you are about to create...simply will not be enough. Trust me.
 
Sugar Crusted Gingersnaps
 
1 c. packed brown sugar
3/4 c. melted butter or margarine
1 large egg
1/4 c. fancy molasses
2 1/4 c. all purpose flour
1 1/2 tsp. ground ginger
1 tsp.  baking soda
1 tsp. ground cinnamon
1/2 tsp. ground cloves
1/4- 1/2 c granulated sugar (set aside for rolling)
 
Beat together your brown sugar and melted butter in a large mixer bowl (or with an electric stand mixer).  Toss in your large egg (minus the shell!!). Continue to beat up this mixture so it gets light and fluffy.  (Lightly coat a 1/4 c.measuring cup with cooking spray) then measure your 1/4 c. molasses - pour this into your sugar/butter/egg mixture and it will just slip right in! Continue to mix together on med-low speed.  Throw in your spices and soda, then blend in the flour 1 cup at a time. Scrape the sides of the bowl to make sure everything is well incorporated if not, beat a little longer, if so...stop mixing it.  Cover the bowl in plastic cling wrap and refridgerate for about an 1 hour to 2 hours.  With your 1 tbsp cookie scoop, make 12 balls per parchment lined cookie sheet. Roll in palms gently to round out and then roll in the reserved granulated sugar. Repeat with the remaing dough.  Bake at 350 degrees for 9 -11 minutes. Don't forget to rotate your pans part ways through the baking for nice even cookies.  Remove from the oven and let them cool about a minute before removing them to a wire cooling rack.
 
 
If you have time, and some of the cookies survive to see another day, store them in an airtight bag or container to maintain freshness.
 
Enjoy!


Monday, July 30, 2012

Monkey Birthday Party

It's no secret I am HUGE fan of Paperglitter parties. So, this time around for Avery's 8th birthday we threw together the Monkey Party designed by no other than Linnette over at Paperglitter.


I decided {as a thrifty mama} to go with the basic monkey kit only because I also have a son...who does not like girly stuff like hair bows and flowers.  This decision allowed me to also use this kit for him should he decide to "Go Bananas" for his own birthday later this year.  And, for once - my blah-blah brown walls actually accompanied the overall party decor quite nicely.

For the occassion, I got straight to baking - but I didn't go overboard...just four different treats for the guests to enjoy.

Like banana cupcakes with swiss meringue buttercream...


 Cool grease proof cupcake wrappers were purchased from Golda's kitchen, the colours lent themselves perfectly to the overall scheme and were decked out with a combination of rounds from the party kit and monkey heads {Monkey'n Around} from Party Stuff.


A two tiered cake with polyer clay monkey keepsake topper and a colour palette drawn from the colours in the kit (plus a pale blue as our extra accent colour)...


The leaves and number 8 on the cake were made from a blend of fondant and gumpaste so they would firm up {and were made 3 days in advance of the cake being assembled). Then, using an edible food writter, the leaves were detailed to reflect the leaf decor in the kit.  The monkey was also made by me {something else I've been doing for a while...okay - years...like about 20!}


Bakerella inspired monkey cake pops with paperglitter flare ... designed by MOI!


and of course...SUGAR COOKIES - no party here goes without sugar cookies. We jazzed up half of them with 3/8" satin tied bows for the little ladies and the gents got the original monkey.


I tried using a new technique I picked up from one of my other favorite reads on the net which made for perfect outcomes like the sugar cookies.

Over at The Sweet Adventures of Sugarbelle, Callye posted a tutorial using a "push pin" technique to accurately mark flat iced cookies so that the details would be picture perfect {in her example she uses LEGO man heads to illustrate this method}.  I think I did pretty darned good if I don't say so myself :). Although it was slightly time consuming, it was well worth the work, as the results couldn't have turned out any better in my opinion. Originally, I began by using a quilt marker pin with a large round head on it, but after a while my fingers began to get sore from gripping something so small...so I thought outside the box - "what else do I have that could poke holes into the icing?" .  Then it came to me....my paper perferator from my makin' memories scrapbook kit. It resembled a stylus, was much easier to hold and gave just as accurate marks in the royal icing.


 After the cookies were finished some were bagged and topped with the treat bag toppers from Linnette's party kit.

Water bottle labels were repurposed into bubble wraps...


Cupcake topper rounds were reduced in size at printing and turned into tokens to adorn the cutlery wraps with pipecleaner monkey tails, and the treat bag flags were re-invented into soda pop bottle decor. Avery scattered the leftover tokens all over the table like confetti! What a smart cookie!


and the bunting banner was sewn together for durabilty and was a huge time saver. {I stacked the words with the last letter on the top of the pile from the sentiments to ensure the banner did not come out backwards}.  We couldn't have "YADHTRIB YPPAH" now could we?  Then we inserted some leaf cutouts randomly and a monkey too for added cuteness and personality.


More leaves were fastened to the other trays and displays to pull through the theme.


And we can't forget the treats for the little monkeys that were at the party! I used the editable text fields to personalize each treat box for all the children that attended, and added eyelets with a grosgrain ribbon handle for easy carrying on the way out. 


...and don't forget the sugar cookies!


Although the party took quite a few hours to put all together {from strategically planning the baking projects to print runs for the week leading up to party day} it was well worth the effort. I thouroughly enjoyed doing it {when do I not?}. 

Enjoy!


Monday, July 16, 2012

Baker Gets Burned


So, I am usually sleeping by now but tonight I am fueled with a little different insight into what I do and why I do it.  Baking is my passion, I love to dream and create new works of edible art that bring smiles and aw to their consumers faces. But, it saddens me to find out that my artwork has been taken from me {it's rightful owner} without request or permission granted first.  Going through school it was ingrained in me about piracy when writing literary papers.  CITE,...CITE ...CITE.  I just expected that all other people out there too would be as honest as me.

Today, for some reason a conversation I had with an acquaintance surfaced in my mind about an incident she found herself faced with.  Her artwork was being plagiarized and pawned off as somebody Else's, no credit given and no permission to use it asked.  It baffled me to try and wrap my head around what people were thinking, and tried to place myself in her shoes. What would I do if it were me?

Today, I found out.  IT ROYALLY SUCKED!  I felt anger, sadness, stupidity...It made me question everything I do, and whether or not to persevere and continue to pursue my passion of baking in general, but more specifically decorative cookie making.  It was a gamble, I posted some of my cookies...and they got into the wrong hands.  It was the hands that followed that made me sad though. There didn't appear to be any questions asked as to where the image came from, I just happened to locate it myself in a google search. And now I wonder how many more cases like this are there.

I have put up a guard surrounding my personal creations, with limited visibility to a community I believe will truly respect my cookies as my personal property and will use them as inspiration and inspiration only.  They will not reproduce them for resale to make a quick buck, and they will certainly consider asking permission first to use a design before proceeding to bake them. And they will always give credit where credit is due.

So, if you are a flickr fan of my stream and you can no longer access some of my images it is for this reason.  I have left available some of the items that are visible here on my blog.  I apologize for this inconvenience but I believe deeply in my heart it is what I need to do to help protect my livelihood and passion.

Thank-you for your understanding. I hope you will continue to read my posts and be inspired by what I have to offer to you.

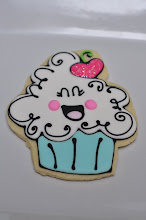
{PS. this cupcake cookie image is copyright protected and is the property of yours truly}


Saturday, July 7, 2012

Rainbow Layer Cake


With school winding down, it meant time to celebrate a successful school year for both my children. As previously posted, the ice cream cone cupcakes were the item of choice for my son's kindergarten class, and now my daughter selected rainbow cake to serve her fellow classmates.

I was super stoked to have another opportunity to prepare this super colourful six layer cake for her grade 2/3 split class.  It was a total show-stopper! The kids loved it, the presentation turned into a question and answer session {the perfect opportunity for my little squirt to practice speaking french, and a chance to me to see her do what she's been studying for the last three years}. Confirmation that my faith in the school's staff and the leaving my child's education in their hands has paid off :)

Unfortunate for me, I only have 2, 8" cake pans so the baking of the colourful treat was quite timely. The end result made it all worth while though!  Note to self: Indulge, buy more cake pans.

So, I first saw this delectable cake on a Pinterest post by Sweetopolita...we gave it the first run back in March for my Dad's birthday. It was good, but we didn't get any pictures and to be honest, it was filled with whipped topping {not the same as a good swiss meringue buttercream}.  THIS cake was the cat's meow!


You can find the instructions on how to make it {Sweetopolita's doodle cake, not Avery's Class cake...this was an original made by me } on Sweetopolita's blog, just follow this link here.  Avery wanted to make it representative of school, so we topped the tower of cake with fondant covered, rice krispie treat apple decked out with the resident worm.

Enjoy!

Thursday, June 21, 2012

Easy Ice Cream Cone Cupcakes


My son graduated today! *sniffle...sniffle...(wipe tears now)*  Yes, he is growing up far too fast.  This year was blurr...seems like it was yesterday I was sending him off to kindergarten... WAIT! I did send him to kindergarten yesterday!  That's right, he finished kindergarten. Gone are the days of "Do I have school today Mom?" Next year it will be all day, every day...who's going to keep me company?

Regardless, we had to celebrate this wonderful occassion and what better way than with a party amongst kindergarten friends and thier families.  So, I decided I better bake...I am known at school for baking up yummy stuff, so I couldn't not deliver today.

I must admit, I did procrastinate on this one but figured great doesn't have to be overkill either. Save the stress and keep it simple.  Next, what do kids like to eat? What usually accompanies cake at a party?  ICE CREAM! {Minus the "ice" part, add a little cake...a little cone...some frosting and sprinkles = Ice Cream Cone Cupcakes}.

FYI - this is not a new concept...I made these for my girl three years ago when she too finished kindergarten and they were all the rage.  Note to self...this is a good idea.  I am totally cupcake girl material, I mean seriously? It's not rocket science...how hard is it to bake in something other than a non-edible cupcake wrapper that you have to peel off, and throw away. Think of these as eco-friendly cupcakes. Okay, I won't go as far as that,  but really? Who needs a wrapper to worry about when all you want to do is just eat the frosting?  These were a win-win for such an occassion, totally kid friendly and 100% edible, yeah that's right...even the "wrapper".

Now there is no shame in straight up vanilla cake (from a box), as we had a little person in the class with a nut allergy. This way I knew there was no chance of cross contamination (sanity for me and her mom too), a major time saver also (5 minutes to prep, tops).

So here we go, you can do this too and be the envy of the party (or neighbourhood kids).  Prepare the cake mix as per box instructions.  Then make'em in F-O-U-R easy steps. Yes, four, count your fingers kids...I do not lie.

Then...


Line your cookie sheet with cones don't fill them too early, (be sure your oven has preheated) otherwise they might go soggy. Obviously, this won't happen immediately...they are meant to hold ice cream...that melts...and gets smooshy.

Don't forget to check for CONE INTEGRITY...that's right, toss the ones with holes because they are counter-productive. What goes in...will come out. Enough said.


CAREFULLY put them into your oven and bake (my lucky number was 18 minutes) BUT your oven may will be different so, start out with a little less time, and add on afterwards. Do a toothpick test to see how things are progressing.


Once baked, remove them from the oven and let'em cool. We wouldn't want our frosting to melt. Now that would just be silly and totally not the purpose of these "cool" treats.

You can ice them any way you want, I chose to go with swirl icing in four colour combos: traditional swirl (chocolate & vanilla), creamsicle (orange & vanilla), strawberry swirl & blue swirl.  I used some disposible icing bags and basic buttercream icing (in a pinch you could buy premade icing and do the same thing).  To make the swirls I bought a 1M icing tip (found at the local bulk barn).


Call me slow, I realized it only after I had painfully filled the icing bags the "old" way, to simplify things I could should have done the following:  filled 1 icing bag with vanilla, and 1 with colour of choice.  Smoshed them together into a larger 18" icing bag loaded with the 1M tip and then I would have had equal parts white: colour {and a lot less grief}.  I saw this concept somewhere...with a good "how to" so when I find it, I will share it with you.

After they were all iced, I put some sprinkles on some and left some naked {not everyone is crazy for sprinkles).  And then we ate, and enjoyed.  Honestly, I thought they would be less messy than a traditional cone...but some kids showed me that they were just as good as the real deal.  Nothing says summer (and schools out) like children with "ice cream" faces :)

Enjoy!


Tuesday, June 19, 2012

Ladybird Love


I have returned from the abyss...spring the past three years has been filled with loss and I this year was full of reflection and tears remembering those that have gone before me.  * Sigh*  In amidst these feelings I truly felt lost and was not in the mood to bake anything...not cookies...not cake...not clay.

Then, out of the blue I got a message from a gal that requested a custom cake topper for her wedding (like two years ago).  Her good friend was getting married, and she too was looking for someone to bring to life her darling sketch of ladybugs in love.  I figured, why not.  Time to turn my slump around.

Lots of emails back and forth, a Bride's vision...and a little creative flare.  Seven hours later of sculpting and baking, her loving ladybirds were the real deal.  After photographing her blushing couple, I got butterflies in my stomach when getting ready to do the reveal.  I was so nervous that my hard work would back fire.


Luckily, to my pleasure she L-O-V-E-D them, ah......breath relief here.  Her kind comments gave me fresh breath and life, reassurance that what I used to love doing  was and is indeed for all the right reasons. Bringing simple pleasure to total strangers, some smiles and memories for years to come.


Thank-you Elyse for reinstilling in me my faith for my craft,
 that there is a place and a purpose for what I do.


Wednesday, March 14, 2012

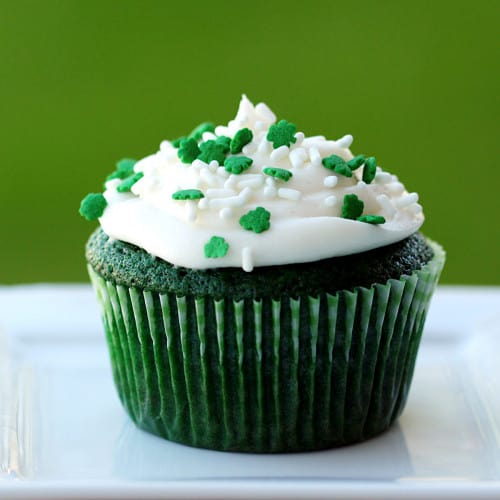
Green Velvet Cupcakes...the Cure for Pinkatitis

I just ate a green cupcake... a Green Velvet Cupcake...


it was; surprisingly satisfying, moist and nicely balanced with it's icing adorned with miniature shamrock quinns and sprinkles{ festive for this time of year}... I think, I liked it. Although at first glance I too was slightly unconvinced...so I simply followed my heart, and mouth... and let the cupcake do the talking.
 
Pinkalicious would have been surprised too to know she could have cured her "rare case of pinkatitis" with the likes of a green cupcake instead of yucky mushy vegetables of the green variety as prescribed by her doctor. Who knew? Cure a cupcake inflicted illness with another cupcake? Brilliant!

No! Not seriously, but for those of you are not well educated about Pinkalicious {Which is probably every person who does not currently have a young daughter, niece, granddaughter or sister below the age of lets say...10 or so}, she's the star in a series of children's books written and illustrated by Victoria & Elizabeth Kann. Pinkalicious is a delightfully witty little girl who loves everything...{you guessed it} PINK! There is never a dull moment in her adventures. You can find out more about her or order the books and even do activities here . Enough about Pinkalicious though, and more about the star of this post, the Green Velvet Cupcake.

With St.Patrick's Day right on the cusp and the kids wanting treats for their classes I did what I do often best...surf {the web} in search of fantastic ideas to use or inspire me to bake better. With luck I was brought to another blog Love from the Oven to whom had baked up this funtastic {yes, I said FUN-TASTIC, it's a word, in my vocabulary and should be in Websters too...you hear that Webster??} recipe borrowed from non other than Bakerella. No sense in reinventing the wheel if I don't have to, I work Smarter, not harder!

 
So here she is, Bakerella's Green {Or Red} Velvet Cupcake Recipe Tweeked* {because I didn't have all the ingredients :)...}

 
GREEN* {or Red..or any other colour for that matter...} Velvet Cupcakes

 
  • 2 1/2 cups all purpose flour
  • 2 cups sugar
  • 1 Tablespoon cocoa
  • 1 teaspoon salt
  • 1 teaspoon baking soda
  • 2 eggs
  • 1 1/2 cups oil* (3/4 c vegetable oil for the cupcakes, Love from the oven used 1 cup)
  • 1 cup buttermilk* (2% worked out just fine, less fat)
  • 1 Tablespoon vinegar
  • 1 teaspoon vanilla
  • 2 oz. red food coloring* ( 1 used 1 tsp of Wilton brand kelly green gel colour)
* note changes to these ingredient quantities

 
1.Preheat oven to 350 degrees.

2.Grease and flour two 8 inch cake pans* (24 muffin cups, lined with wrappers of your choice)


 3.Lightly stir eggs in a medium bowl with a wire whisk. Add remaining liquid ingredients and stir together with whisk until blended. Set aside.


 4.Place all the dry ingredients in your mixing bowl and stir together really good with another wire whisk.


 5.Add wet ingredients to the dry ingredients and mix on medium-high for about a minute or until completely combined.


6.Pour into cake pans and then drop the pans on the counter a few times to release any air bubbles.* I used a 1/4 c. mashed potato scoop to get even amounts of batter in each of my pre-lined tins...I was able to make 24 cupcakes from this batch of batter.


 7.Bake for about 30 minutes or until a toothpick inserted comes out clean.* (cupcakes took about 20-22 minutes, they were spongey to touch when tested, and a toothpick inserted came out with a few moist crumbs on it.)


 8.After about ten minutes, remove from pans and cool completely on a wire rack. I also cover in plastic wrap while the cakes cool.


 9.Then make the frosting of your choice*. {People normally put a cream cheese icing with red velvet cakes. I used a buttercream icing that seemed to just melt in my mouth.}


Happy St. Pattie's Day!


Tuesday, March 13, 2012

Bitty Two Bite Brownies


Sink your teeth into one of these babies and you will understand why they don't last long at all.  Nobody ever wants to experience the uneasiness and displeasure of running into "The Shortage", so typically I will make a double batch to avoid this problem for the sake of my family. {Way to take one for the team Mom!}  Plus, I really don't like having to cut the butter in half...why add an extra step if I don't have to?  The standard recipe will yield about 3 dozen of these yummy little bite-sized brownies using a small sized cookie scoop.  Be careful not to overbake them though, otherwise they lose their "chew".  It's better to underbake them and then let them firm up in the pan before flipping them out.  I found my lucky number to be about 11 or 12 minutes - But all ovens are different, so know your oven..what works for me may not be the case for you!

Try these a la mode...right from the oven, hot and steamy with a scoop of classic vanilla drizzled with a little chocolate sauce on top.. and there you have it, bite sized pieces of HEAVEN!   If you don't like the ice cream on top, hack up a few brownies and put them INTO the ice cream...with fudge sauce ice cream topping and pecans (if you can have them) and PRESTO! You have your very own Brownie Surprise Soft Serve Ice Cream treat in a cup/bowl. YUMMY!

{You could have it}
Or on a stick,
or in the air,
and on a trip,
packed in lunches,
served at brunches...

{SNAP OUT OF IT LADY!... No more Dr. Seuss for me, call me crazy or hopped up of cocoa and sugar...whichever; either is just as accurate. The latter may make you feel less guilty, and I am okay with that.} Move over Green Eggs and Ham...I could be onto something here... Like cake pops are to Bakerella, Bitty brownies could be the next big thing.

To make your own chewy bits of fudgey goodness, just mix up the following:

Bitty Brownies {Makes ~ 24-36 bite sized brownies}

Preheat your oven to 350 Degrees F
Spray your mini muffin pan(s) liberally with non stick cooking spray and set aside.

Mix together in the bowl of a stand mixer (if you have one) until light and fluffy:
1/4c. butter (softened, but not melted)
1 1/4 c. granulated sugar

Add in 1 at a time mixing inbetween each addition:
2 large eggs (room temperature)

Then add:
1 tsp. vanilla
1 tsp. prepared coffee (hot or cold)

Lastly, mix in the dry ingredients into the moist and blend until completely incorporated:
1 c. all purpose flour
1/2 c. cocoa
1/4 tsp. baking powder
1/4 tsp salt


Scoop your batter into the prepared mini muffin pans using your small (1-2 tbsp size) cookie scoop. 


Bake at 350 degree F oven for 12-15 minutes. DO NOT OVERBAKE THEM or they will dry out.  They should still be soft to touch when tested.  Remove from the oven , and carefully loosen the edges of each brownie if they're stuck.  Let them cool in the tin for abotu 5 minutes before turning out onto a wire rack.  Re-spray your cooled tin (if you only have one like me) and refill with your remaining batter. Bake. Cool. Eat. Enjoy!

Monday, March 12, 2012

Baking - Uninterrupted

In less than twelve hours  my husband will be jet setting to another hotter, sunnier short-bearing destination for work....and lets just say I can think of somewhere else to be other than Manitoba too.  Needless to say he will be working, he won't 'be here... in Manitoba... where we still have lots of snow

Typically, when he travels in the winter months it usually blizzards {In fact my odds of it blizzarding when he's gone are far better at me ever winning a lottery} and I am left to fend for my kids and myself.  Believe it or not, I... {Yes, "I"} got a snow blower last year...how many women can say that?  But it was out of necessity, and yes, I know how to use it.

Half of the time he'll be gone, my son to will be away from the house in school (like his big sister). After wiping my tears and blowing my nose a couple times I plan on filling the empty hours with nothing but BAKING... all by myself, UNINTERRUPTED.  With St.Pattie's right around the corner, and my Dad's birthday too a cake will be in order, my options are unending.  My opportunity to make up the rainbow layer cake I've been gawking over from Sweetopolita with such vivid colours is at the top of my list. Who doesn't like rainbows? How could I pass this one up?


Sweetopolita's Rainbow Doodle Cake
Now, my Dad has never been a fan of fondant (I don't know why, he loves marshmallows and fondant can be made from marshmallows and icing sugar if you don't want to trade an arm and leg for a couple pounds of the premade variety) but that's fine, the lemon butter cream Rosie has suggested sounds Divine and will compliment the vanilla cake marvelously without doubt.

Now, if only I could break my little sunbeam kitchen stand mixer I would have real good reason to go and by my dream kitchenaid stand mixer...No, I am not planning anything - it broke, really.


Look at the rainbow... man, this is going to be hard to choose just one...it's like women and our shoes, why not have an assortment so they will match our outfit or our mood.  The orange is hot and so is the ice blue, er or maybe the apple green one, but if I pick a girly colour (PINK) my husband will be less apt to using my mixer and potentially breaking it.  I don't use his tools, so why should he use my mixer? Right?

Here's to baking tomorrow, rainbow cake in the near future and a few Luck o'the Irish Green Velvet Cupcakes for Ethan's class party on Thursday.  Stay tuned! This should be a week filled with posts!


Green Velvet Cupcakes to try from Love from the Oven

Smiles!

Sunday, March 4, 2012

Supersized Frogs...would you like Flies with that?

Spring is soon to be upon us, and before I know it the back yard will be swamped, gushy and an atrocious mess... the perfect conditions for after school puddle jumping sessions, soggy pants and mud riddled clothes. Ah, the smell of melting snow and the croaking of frogs?

Earlier in the week a neighbour contacted me to follow up on a request she had made months ago. Her daughter was soon to turn seven and she felt cookies would be a perfect send-off token for all the little buddies attending the party. Like any good neighbour and delighted by the request I said "Yes, I can bake them for you." Followed by "Can I borrow a cup of sugar?" NO! Not really, I did have a late night door knocking a couple weeks back though and this was the exact conversation...

{firm knock at door}

Me:  "Hi."
Neighbour : " Hi, sorry to bug you - my wife decided to make some muffins, she ran out of eggs."
Me:  -
Neighbour:  "Could she borrow two eggs?".
Me:  "She can have them, I don't need them back.{smirk, poor late night humour.}"

Then I handed over my eggs, calculating how many I too would need for the week to tie us over to payday shopping, deliberating with myself if I should have given them up...that was equivalent to 1 double batch of sugar cookie dough. 

Me: "Happy Muffin Making, what time should we be over in the morning for breakfast?" {Smarta#$
{Door closes, neighbour leaves with my eggs in hand}.

I love my neighbours, they really are great, I had never experienced that before where someone would just walk over and ask to borrow something of that sort. Perhaps it's the small community we live in.  As long as the requests stop at baking supplies and not

 "Hey, can I borrow your wife Chad?  I need her to bake me a cake."

ANYWAYS... attempt at humour will now be cast aside and I will get to the order of today's business.

The other neighbour, with the cookie request - {before the side bar, and interlude of neighbourly commentary}  told me her daughter just loves frogs.  I recalled this from our original conversation and like a kid in the candy store went to town and began drawing up templates for potential winners to use for this very occasion.   Remember back a little while ago to my Princesses and the Frog post?  Well, that's the frog! With a few minor tweaks for eyes and mouth.  He was a little smaller than I figured for this party favour though, so I enlarged my pattern {ugh! the P word, I need to get me some cutters that can do double duty...ah, Sugarbelle...share with me your inner knowledge on "How the heck you do it?"}

Moving forward, a sucker for punishment  {as may already know for past posts} I drew my picture on paper, then traced the outline onto a piece of parchment paper.  Then I outlined this onto a piece of chipboard and cut it out.  This is what I got...


What do you get when you take a double batch of cookie dough and a quite housePRODUCTIVITY!!!  Roll, Cut, transfer, bake, cool, repeat.  Twenty four cookies later I was done and ready to move onto icing these little froggies. {Note time to complete - 1 hour, 10 minutes. Including clean up. YEAH ME!}

I made my icing ahead of time, thinned it to piping and flood-filling consistency, added my colours and then let them sit to allow for any air bubbles to surface and vanish in an attempt to have flawless cookies.

Day 1: Bake & Pipe outlines
First I piped the eyeballs using a Number 2 tip.
Then I filled in the gaps with the face outline, again with a Number 2 tip.
Then I made the crown outlines with a number 2 as well.


I let the outlines set up for about 45 minutes.  Then I proceeded to fill in the eyeballs and crowns. 


Wait some more, about 30 minutes, flood fill the green.  I wanted my frog warts to be flush with the green and not raised up, so I piped them randomly onto the bridge of the "nose" so they would settle in.


Then I left them over night undisturbed to harden up.

Day 2: Adding the finishing details

Using a Number 2 tip I piped the arch for the frogs smile, and added the pupils to the eyes with black, and added the rosey pink cheeks for added cuteness. 


Then I added the Monogram with a number 1 in piping consistency in black so they would pop out.  Time to finish drying.  I wrapped them up on Sunday, tied them with coordinating ribbon and attached a cute little tag on them. I love plays on words, how could I resist this time?


Mission complete, party favours ready for pick up.


Pin It